

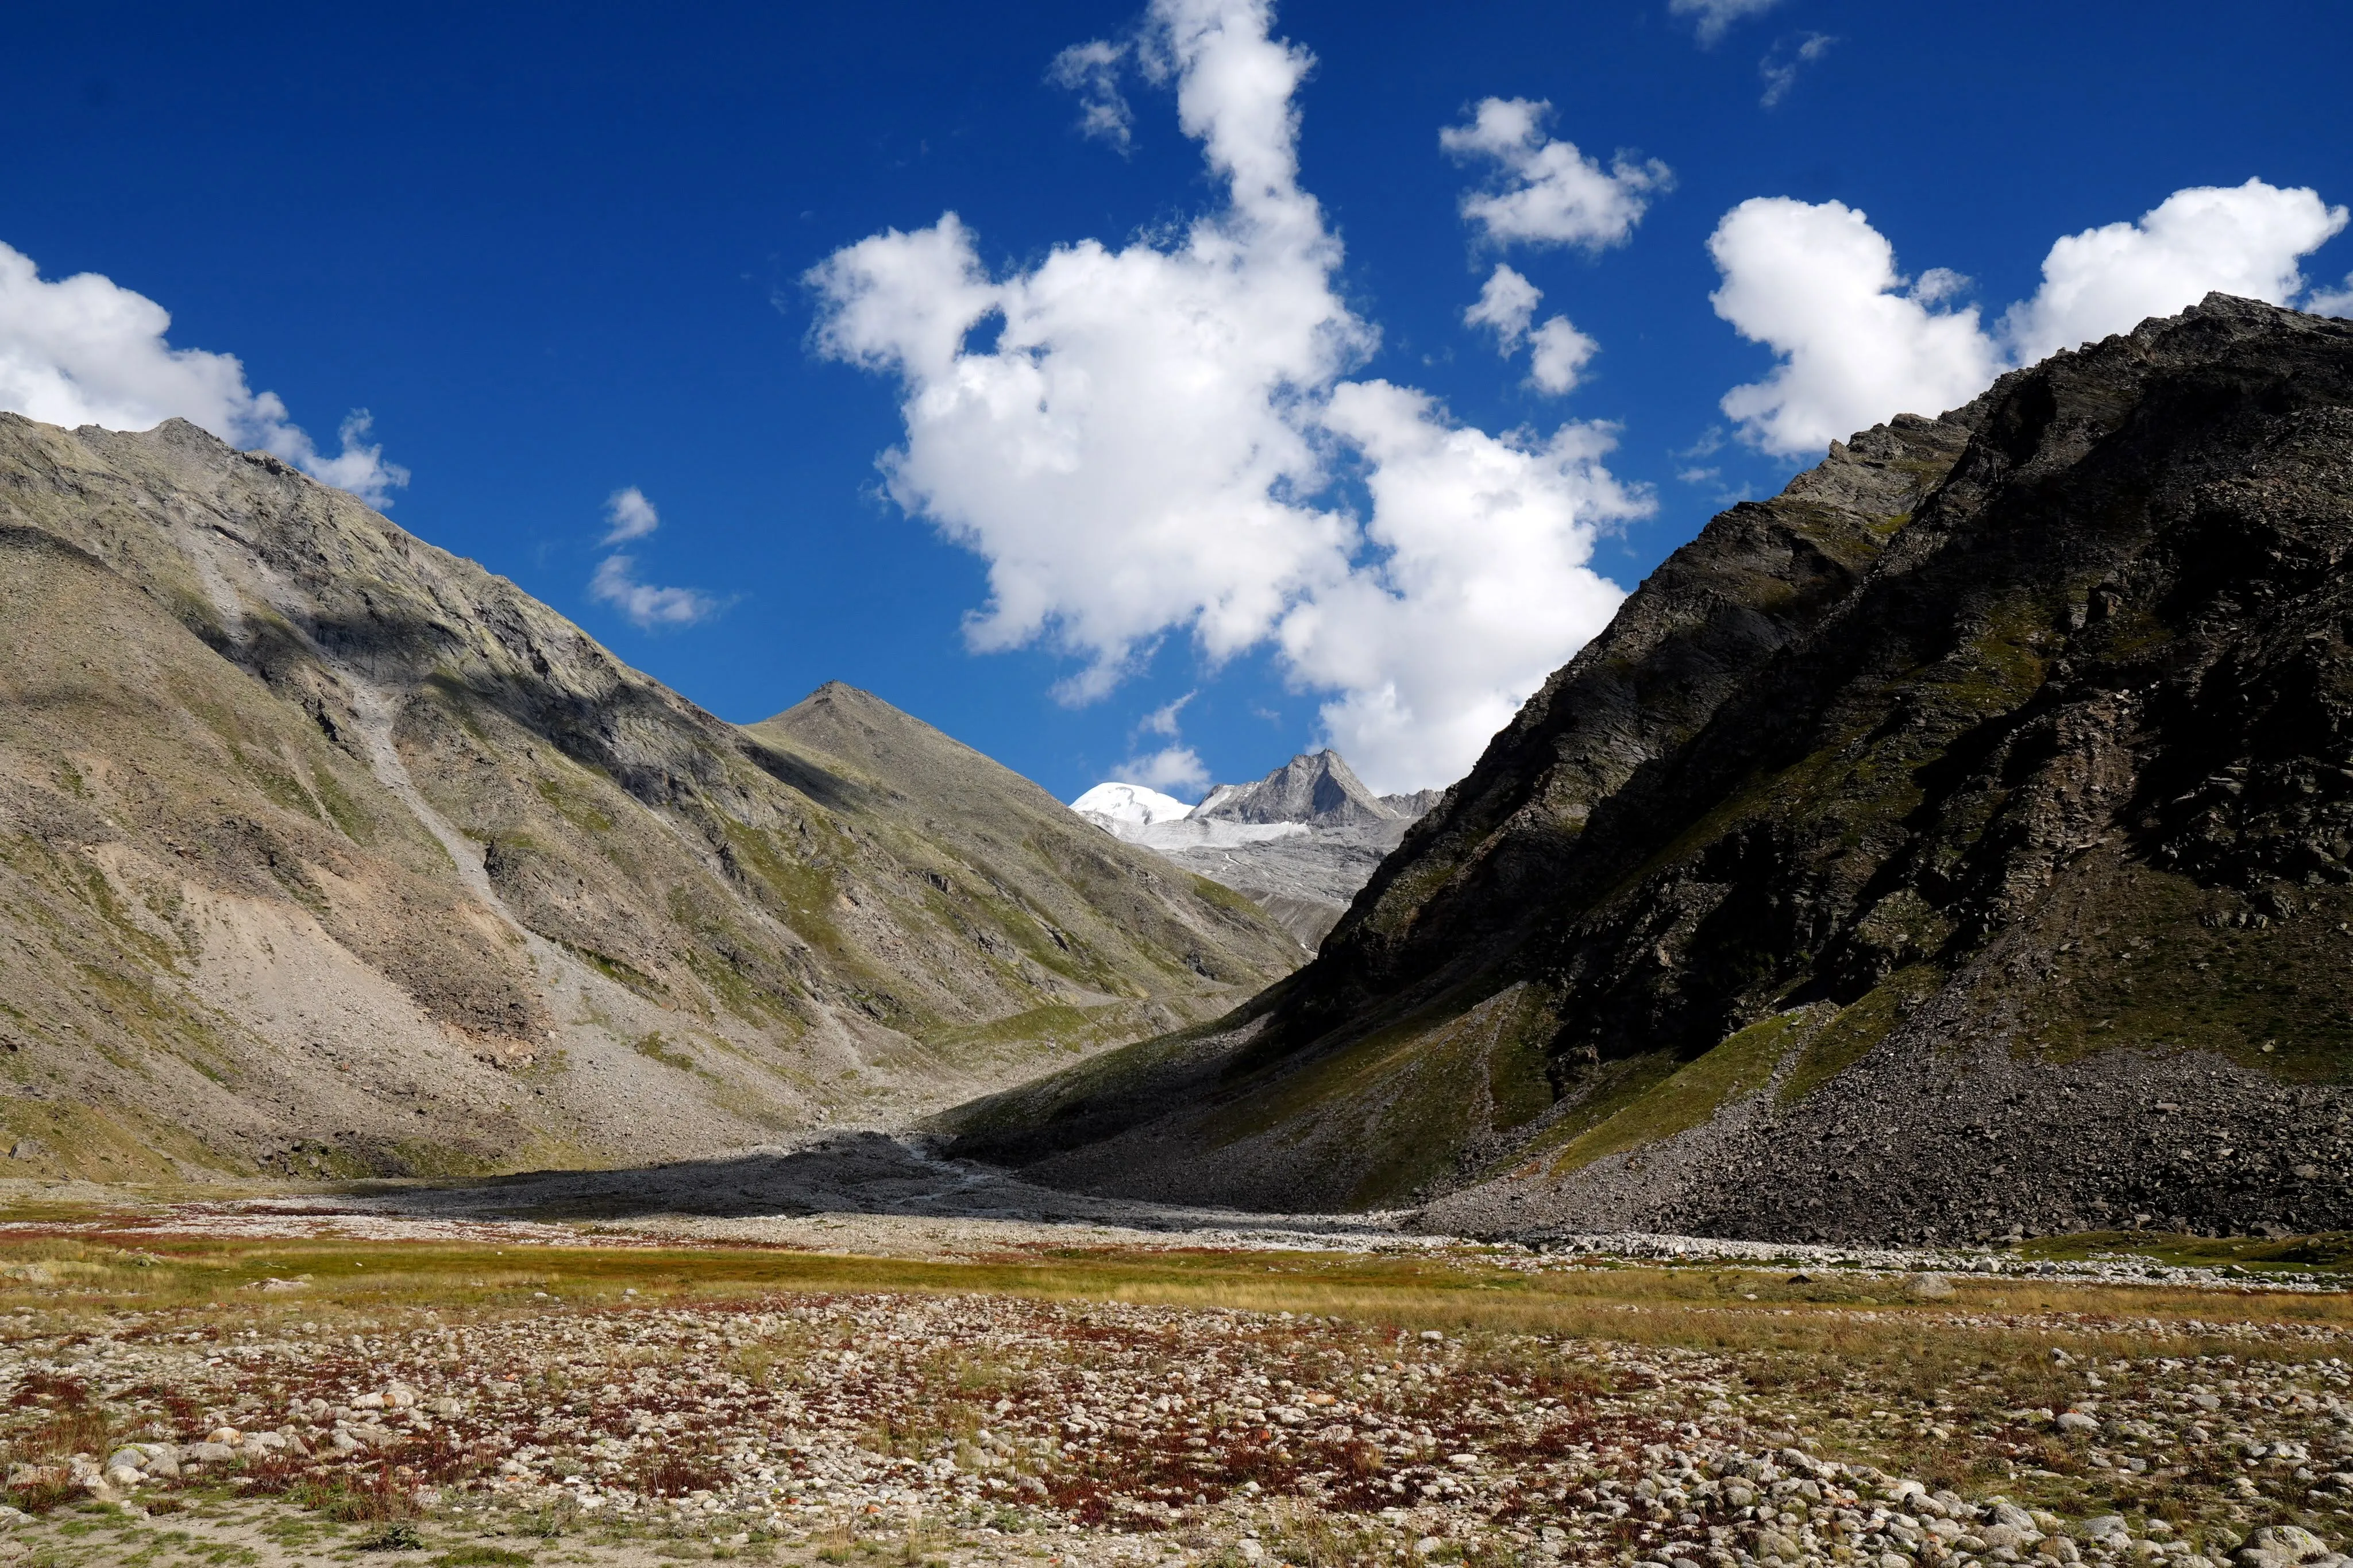
Located at around 13,202 ft above sea level, Miyar Valley stretches north from the town of Udaipur in the Lahaul-Spiti district. The valley is carved by the Miyar River, which flows from the Miyar Glacier and eventually meets the Chandra Bhaga River. This remote valley is surrounded by the high mountain ridges, where a small Buddhist farming community and flocks of Himachali Gaddi shepherds live.
The Miyar Valley Trek Duration typically ranges from 7 days and 6 nights, covering 60 km, of Miyar Valley Trek distance, depending on the chosen route and campsite extensions. The Miyar Valley trek takes you through lush meadows, ancient gompas, Miyar river crossings, and high-altitude camp sites like Zardong, Palpu, and Gompa. It remains mostly moderate in difficulty, with long but gradual ascents, making it accessible to fit beginners and rewarding for seasoned trekkers.
The Miyar Valley Trek Best Time is from mid-June to late September, when the snow has melted and the valley bursts into color with wildflowers. During this window, the skies are generally clear, the river crossings are manageable, and the temperatures are pleasant for camping.
For those looking to step off the beaten path, the Miyar Valley Trek Offers more than just a journey. It’s a rare opportunity to walk through a living, breathing Himalayan landscape that remains as untouched as it is unforgettable.
Highlights of the Miyar Valley
1. Tharang Meadow: The Valley’s Front Door
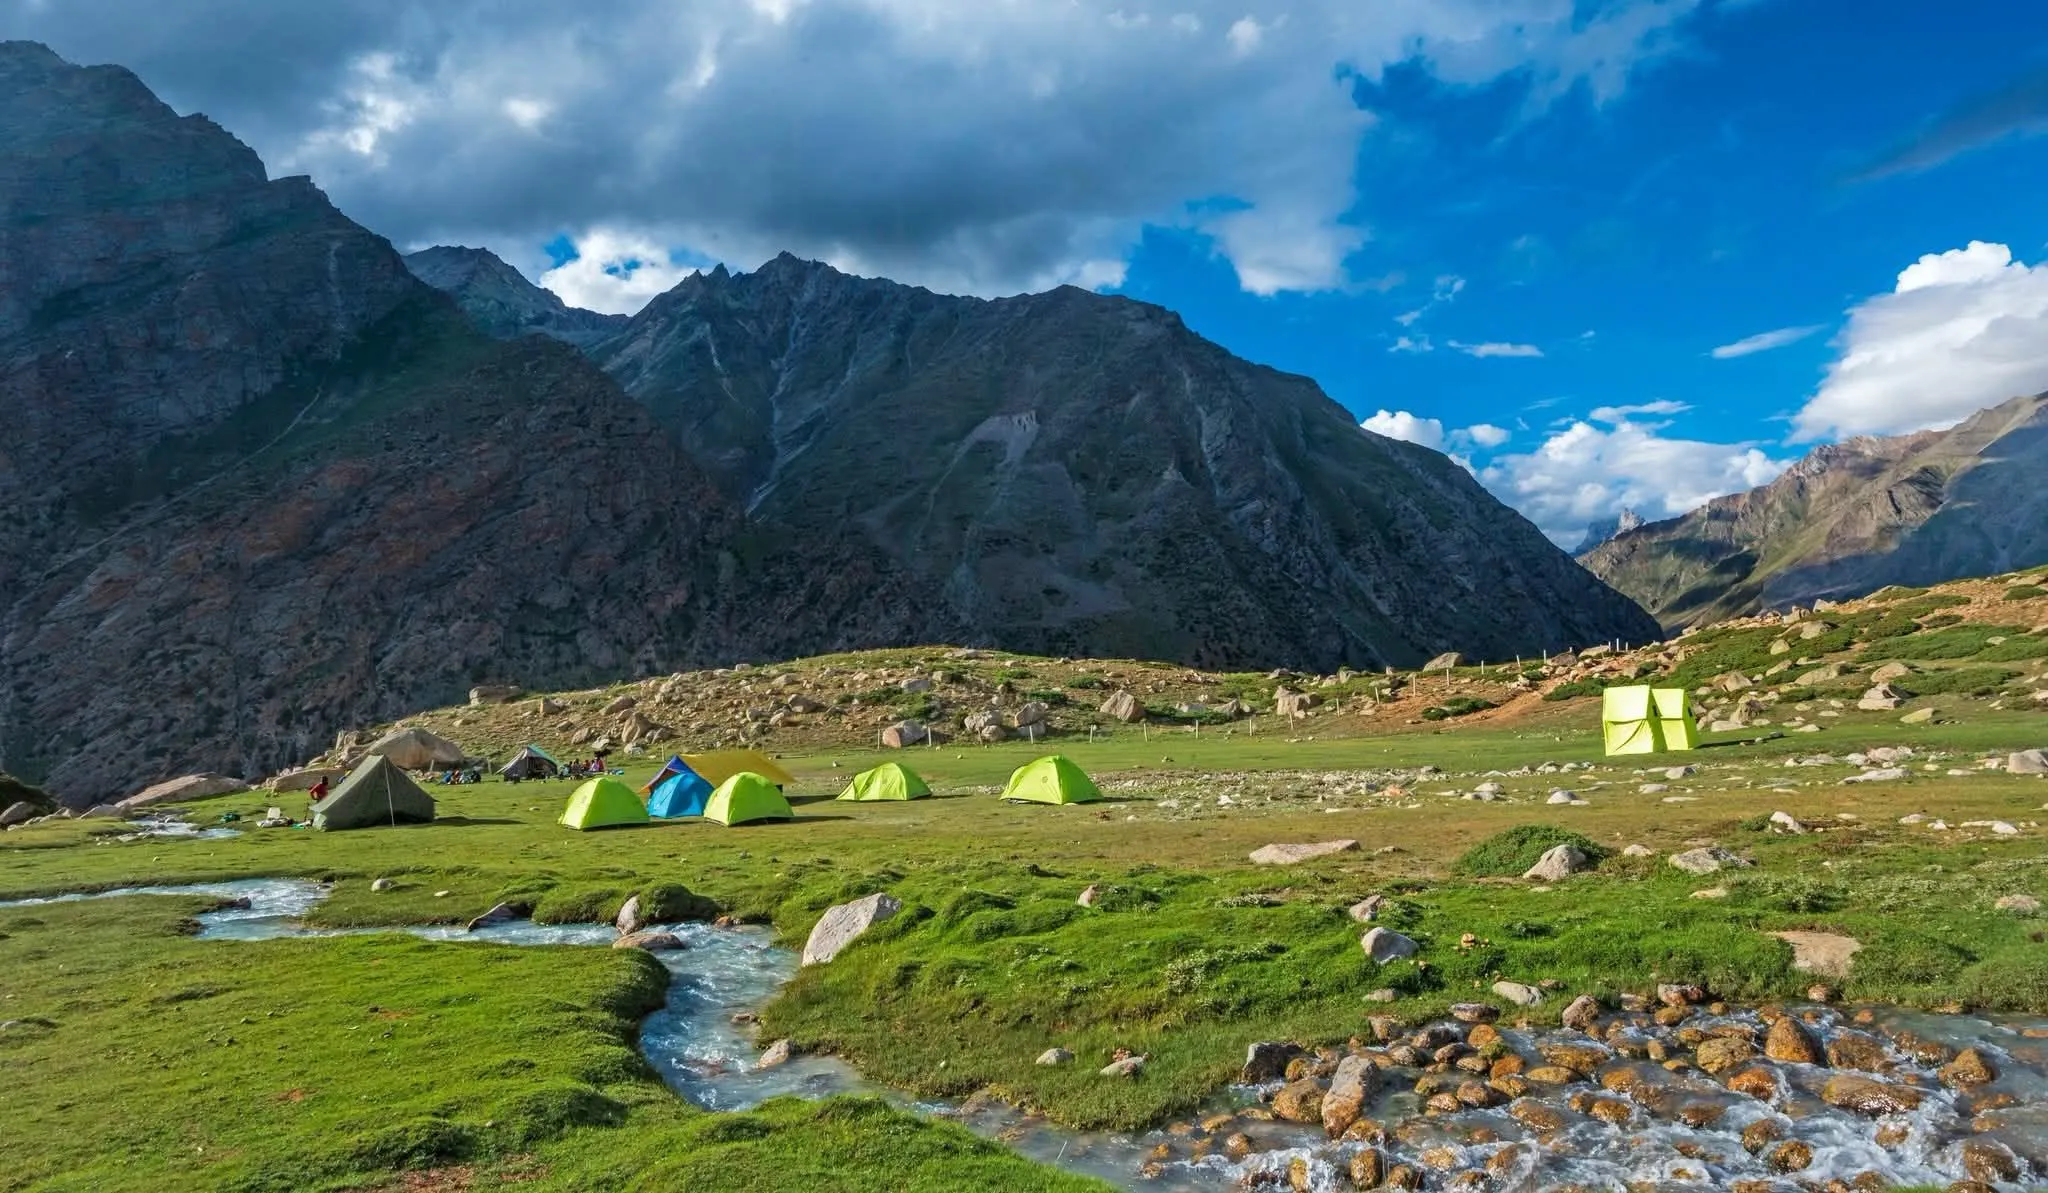
Tharang is the first place where the valley truly opens up. After leaving Khanjer and climbing through a long series of switchbacks, you step onto a broad meadow that looks as though glaciers carved it out long ago. Rolling grasslands stretch in every direction, interrupted only by sparkling side streams and the occasional horse or yak grazing quietly. Steep peaks rise on either side, forming a natural enclosure that makes the meadow feel private and calm. Many trekkers also pause here mid-morning to refill bottles and let the scale of the surroundings sink in. It is the first real glimpse of how vast and peaceful the Miyar Valley is, and it sets the tone for everything that follows.
2. Yolling Campsite: Golden Evenings Beneath the Cliffs
Yolling is a flat, flower-speckled meadow framed by towering cliffs, and it is loved above all for its evenings. As the sun drops behind the surrounding peaks, the rock faces take on shades of orange, pink, and gold, and the whole camp seems to glow. The sky here is often clear, which makes the spot ideal for stargazing once darkness settles in. Cold air arrives quickly after sunset, so pack a warm layer and be ready to head into the tents when the temperature falls. Because the cliffs make the camp feel secluded, Yolling is also a good place to slow down and reflect on the day’s walk. Photographers should keep their cameras close at hand, since the light here changes dramatically in just a few minutes.
3. Zardong: Wide Grasslands and Wooden Bridges
Zardong is where the valley flares open in earnest. The trail leaves the farmland behind, crosses a narrow wooden bridge over a rushing creek, and suddenly the landscape stretches out in every direction. Vast grasslands roll toward snow-dusted peaks, and small alpine flowers dot the ground beneath your boots. Several river crossings along the way add a touch of adventure, and the swaying footbridges are memorable in their own right. The campsite itself is a broad, flat space tucked along a ridge, offering sweeping sunset views and an atmosphere of complete tranquility. At night, the sound of the nearby stream and the occasional call of alpine birds may be the only sounds you hear. This stretch captures the essence of high-altitude trekking: open, humbling, and unforgettable.
4. Kesar Yon Choo: A Mirror at 13,200 Feet
Sitting at around 13,200 feet, Kesar Yon Choo is the highest and perhaps most striking point on the route. The name is often translated as “lake of pure waters,” and on a windless day the glacial lake’s surface reflects the sky so cleanly that water and air seem to merge. Reaching it is a demanding part of the journey. The day begins with a short descent, followed by a steep climb past a centuries-old Buddhist stupa before the trail opens toward the lake. Once you arrive, the silence is broken only by wind and the murmur of meltwater.
5. Gompa Campsite: Where the Silence Feels Sacred
Gompa is the most remote camp on the route, and its stillness is hard to put into words. The name means monastery, but there is no working monastery here today. What remains is an open shelf of land wrapped in snowfields and glacial terrain. From the campsite, the views sweep across the raw edge of the Zanskar range, and the only sounds are the wind moving over the high ground and the occasional trickle of meltwater. Because the camp sits so far from settlements and mobile signal, it feels like a place outside ordinary time. Many trekkers spend the afternoon reflecting, journaling, or simply watching the light shift across the peaks.
Miyar Valley Trek Complete Guide
Our mission has always been to ensure that no trekker steps into the Himalayas without the right perspective. A trek is not just a checklist of summits; it is a serious commitment to the outdoors. Having the right information is what separates a reckless climb from a soulful journey.
This section serves as your definitive manual for the Miyar Valley Trek. We have distilled years of mountain experience and real-time feedback into this guide to give you a clear, honest picture of the trail.
We provide this depth of information because we want you to be more than just a visitor—we want you to be a prepared, responsible trekker who respects the mountains as much as we do.
Day 1: Drive from Manali to Khanjer (Overnight Stay Camp)
Drive Distance: 140 km | Drive Duration: 5-6 hours | Pick up point for Himalayan Hikers trekkers: Beas Bridge, Manali
Day 2: Trek from Khanjer to Yolling (Overnight Stay Camp)
Trek Distance: 9 km | Altitude Gain: 11,564 ft to 12,345 ft
Easy-Moderate. Gradual climb through a series of switchbacks till Tharang.
Day 3: Trek from Yolling to Zardong Campsite (Overnight Stay Camp)
Trek Distance: 12 km | Altitude Gain: 12,345 ft to 12,667 ft
Goes through the village route with farmlands on the right. You cross a river bridge and also come across a wide open field.
Day 4: Trek from Zardong to Palpu via Kesar Yon Choo (Overnight Stay Camp)
Trek Distance: 13 km | Altitude Gain: 12,667 ft to 12,782 via 13,202 ft
Start with a descent, followed by a steep section towards Stupa. After that the trail is gradual. Landscapes frequently change colour.
Day 5: Trek from Palpu to Gompa (Overnight Stay Camp)
Trek Distance: 12.5 km | Altitude Gain: 12,782 ft to 12,828 ft
Day 6: Trek from Gompa to Tharang (Overnight Stay Camp)
Trek Distance: 7 km | Altitude Loss: 12,828 ft to 12,270 ft
Day 7 : Trek from Tharang to Khanjer. Drive back to Manali (Overnight Stay Camp)
Trek Distance: 8 km | Trek Duration: 5-6 hours | Altitude Loss: 12,270 ft to 6,730 ft via 11,564 ft
Drive Distance: 140 km | Drive Duration: 5-6 hours | Drop off point: Beas Bridge, Manali
Day 1
Day 2
Day 3
Day 4
Day 5
Day 6
Day 7
Day 1: Drive from Manali to Khanjer (via Udaipur)
Drive Distance: 140 km
Drive Duration: 5–6 hours
Pick-up Point: Beas Bridge, Manali
Altitude Gain: 6,730 ft (Manali) to around 11,564 ft (Khanjer)
Highlights: Into the Wild — Through the Atal Tunnel and into Lahaul’s Hidden Valley
Your Miyar Valley trek begins at the Beas Bridge, Manali, where trekkers are kindly requested to arrive by 7:00 AM for pickup. The Himalayan Hikers team will receive you here and after a short briefing, you will be taken to Khanjer village via shared taxi.
The Manali, a bustling mountain town known for its cafes and tourist buzz. But within minutes of hitting the road, you’ll be leaving it all behind. The drive starts with a journey through the iconic Atal Tunnel, a marvel of engineering that connects Kullu to the Lahaul valley in about 20 minutes. It’s a passage that feels like crossing from one world into another.
Emerging into Lahaul, you’re greeted by a stark contrast in landscapes, dry, rugged mountains tower above the road, their folds painted in shades of brown, grey, and gold. The air here feels sharper, quieter, and charged with something ancient.
The route continues along the Chandra and Miyar rivers, winding past small villages, ancient gompas, and occasional herds of mountain goats. You’ll pass through Udaipur, a small town with deep cultural roots and a famous temple (Margul Devi) worth a brief roadside glance.
The final stretch from Udaipur to Khanjer is narrower and more remote. This final stretch gives off a chill vibe, with quiet villages, wild apple trees around, and amazing views of snow-covered peaks in the distance.
By late afternoon, you arrive at Khanjer, your trailhead and first overnight stop. At 11,564 ft, you’ll already be feeling the altitude, so it’s important to rest, hydrate, and prepare your gear. The sound of the river and the silence of the valley offer the first taste of the solitude ahead.
Pro Tip: The sun sets earlier in the Lahaul valley due to the steep mountains. Layer up by 4:30 PM and take a short acclimatization walk near the campsite to help your body adjust.
Day 2: Trek from Khanjer to Yolling
Trek Distance: 9 km
Altitude Gain: 11,564 ft to 12,345 ft
Trek Duration: 5–6 hours
Trail Type: Gradual ascent through meadows and river crossings
Highlights: Meadows of Tharang and the First Views of the Miyar Valley
After a restful night at Khanjer, you begin your first day of trekking into the heart of Miyar Valley. The trail sets a gentle pace, winding upward through a series of broad switchbacks. You’ll feel the altitude slightly today, but the climb is steady and manageable, perfect for easing your body into the rhythm of the journey.
As you leave Khanjer village behind, the scenery quickly shifts into the golden pastures that begin to stretch out on either side. You can see horses, yaks, and other cattle grazing and dotting the beautiful green pastures under the clear blue sky. As you continue your walk ahead, the valley opens wide, giving you your first sweeping views of Miyar’s dramatic and glacier-carved landscapes.
You’ll pass through the Tharang, a picturesque meadow that feels almost sculpted, with its undulating grasslands and sparkling side-streams. It’s an excellent spot to take a mid-morning break, refill your bottles, and soak in the uncharted beauty around you.
Beyond Tharang, the trail continues its gentle climb, threading through a mix of flat grasslands and rocky patches. Occasional river crossings on makeshift wooden bridges add a touch of adventure to the day.
By early afternoon, you’ll reach Yolling, your campsite for the night. It’s a flat, flower-speckled meadow surrounded by towering massifs. As the sun dips low, the mountains catch fire in shades of pink and gold. It’s a sight that will stay etched in your memory forever.
Pro Tip: Start early today to walk in cooler weather and to give yourself plenty of time to adjust to the higher altitude. Yolling often has clear skies in the evening — ideal for photography!
Day 3: Trek from Yolling to Zardong Campsite
Trek Distance: 12 km
Altitude Gain: 12,345 ft to 12,667 ft
Trek Duration: 5–6 hours
Trail Type: Gradual ascent with sections through farmlands, river
crossings, and open alpine meadows
Highlights: River Crossings and the Vast Meadows of Zardong
The day begins with a sense of quiet wilderness. After leaving Yolling behind, you’ll gradually ascend along the river’s left bank. The trail is gentle but long, perfect for stretching your stride and settling into the rhythm of the high mountains.
One of the unique aspects of today’s route is the mix of cultivated life and wild openness. Early in the trek, you pass stretches of traditional farmlands — patches of barley and mustard tended by locals during the short summer growing season. The land feels lived-in but never crowded.
A few hours in, you’ll cross a narrow wooden bridge swaying above a gushing creek. It’s a thrilling moment that gives way to one of the trek’s most iconic scenes, like a wide-open meadow that seems to stretch endlessly ahead. With the valley flaring open around you and snow-dusted peaks framing the horizon, it’s the kind of view that demands a long pause and a deep breath.
The final stretch to Zardong campsite is a gentle incline across rolling grasslands, often scattered with tiny alpine flowers. Zardong itself is a vast, flat campsite tucked along a ridgeline, offering stunning sunset views and an incredibly peaceful atmosphere. The sound of the nearby stream and the occasional chirp of alpine birds are likely the only things you’ll hear tonight.
Pro Tip: Keep an eye out for herds of Himalayan ibex grazing on the slopes above — sightings are rare but not impossible if you’re quiet and observant.
Day 4: Zardong to Palpu via Kesar Yon Choo
Trek Distance: 13 km
Altitude Gain: 12,667 ft to 12,782 ft via 13,202 ft
Trek Duration: 6–7 hours
Trail Type: Mixed terrain – descents, steep climbs, and undulating
meadows
Highlights: Crossing Kesar Yon Choo – the “Lake of Pure Waters”
Today’s trek is as challenging as it is beautiful. You begin with a gentle descent out of Zardong, the river murmuring below as you leave the meadows behind. The trail soon ascends sharply, leading up to a centuries-old Buddhist stupa that quietly watches over the valley below, almost like a peaceful guardian tucked into the environment. This climb is brief but steep, ready to test your limit.
The real magic begins as the trail opens up toward Kesar Yon Choo, a glacial lake shimmering at an altitude of 13,200 ft. The name means “Lake of Pure Waters,” and on a still day, the surface mirrors the sky so perfectly it feels unreal.
From the lake, the trail eases again, dipping through patches of alpine tundra. You’ll notice the dramatic color shifts in the scenery from grey screen to gold-tinged grass, and pockets of wildflowers if you’re trekking in Himachal Pradesh during July or August.
You’ll reach Palpu by late afternoon, a gentle rise nestled between ridgelines, perfect for a quiet night under the stars. If the skies are clear, this is one of the best stargazing spots on the trek.
Pro Tip: Bring at least 2 liters of water when you go from Zardong. The water sources en route are seasonal and may be dry post-August. Kesar Yon Choo itself may be frozen early in the season.
Day 5: Trek from Palpu to Gompa
Trek Distance: 12.5 km
Altitude Gain: 12,782 ft to 12,828 ft
Trek Duration: 5–6 hours
Trail Type: Gentle, undulating trail across alpine plains and
glacial streams
Highlights: Remote Monasteries and the Spiritual Stillness of the Upper Valley
By now, the rhythm of the valley is in your bones. You feel the cool air of early mornings, hear your boots crunch on frozen ground, and catch the distant whispers of the mountains. Today’s trek is long but gentle, with barely 50 feet of altitude gain, allowing you to walk free and soak in the remoteness of the Miyar Valley trek.
The trail unfolds through wide alpine plains, hemmed in by ancient mountains carved by millennia of ice. You’ll cross small glacial streams and patches of moraine that glint in the sunlight, occasionally passing fluttering prayer flags tied to solitary cairns.
As you approach Gompa, the scene feels otherworldly, a place far removed from the modern world. The name Gompa means monastery, and while there may not be a functioning monastery here, the spot exudes a sacred stillness.
The Gompa campsite is located on an open shelf with near-panoramic views of snowfields, glacial snouts, and the raw edge of the Zanskar range. The silence here is profound, which is only broken by the soft wind.
Pro Tip: Even if you’re not religious, this is a good day for quiet reflection. Bring a journal or take time to simply sit and observe. This kind of peace and calm is pretty rare, even up in the Himalayas.
Day 6: Trek from Gompa to Tharang
Trek Distance: 7 km
Altitude Loss: 12,828 ft to 12,270 ft
Trek Duration: 4–5 hours
Trail Type: Gradual descent with open meadows and river crossings
Highlights: Returning Through Meadows – A Gentle Goodbye to the High Mountains
The journey turns inward today, both geographically and emotionally. After spending a few days hiking further into the valley, coming back down toward Tharang today feels like a gentle goodbye. It’s like walking back through a familiar place that now feels close and almost personal.
The trail winds down gradually through open alpine meadows, where the light plays differently now. As the altitude gradually decreases, the oxygen in the air becomes more abundant. This usually makes you feel lighter and more nimble, so you can really enjoy the view around you with a calm, centered feeling.
The descent offers a new perspective on the valley: what once seemed wild and imposing now feels warm, expansive, and known. You’ll pass some of the same river bends and grazing fields you saw on the way up.
You’ll get to Tharang by early afternoon. The campsite is the same spot you saw earlier, but it feels different now. A calm, content vibe often settles in here. Conversations soften, people take a moment to reflect, and gradually, the wave of returning to everyday life begins to feel closer on the horizon.
Pro Tip: Take photos facing backward along the trail — they’ll often reveal stunning perspectives you didn’t notice on the way in. Also, if the weather allows, Tharang is a beautiful place for an evening group reflection or solo journal session
Day 7: Trek from Tharang to Khanjer, Drive to Manali
Trek Distance: 8 km
Trek Duration: 5–6 hours
Altitude Loss: 12,270 ft to 6,730 ft by 11,564 ft
Drive Distance: ~140 km
Drive Duration: 5–6 hours
Drop-off Point: Beas Bridge, Manali
Highlights: Descending Through Familiar Trails and Driving Back into the World
Today marks the final leg of your Miyar Valley adventure. You’ll start the day with a gentle descent from Tharang to Khanjer, retracing your first day’s route. The switchbacks and winding river bends that once guided you into the valley now stand as your departure, offering a peaceful last walk through an environment that has probably left its impression on you.
The air thickens as you lose altitude, the green intensifies, and distant village sounds start to filter back into the silence. It’s common to feel a sense of bittersweet calm with a mix of gratitude, tiredness, and a quiet reluctance to leave this world behind.
Before you drive back to Manali, the Himalayan Hikers team gathers at Khanjer for a heartfelt certificate and photo ceremony. Trekkers walk up one at a time to get their certificates, a little keepsake that shows off their adventurous journey. Each face tells a story of challenge, perseverance, and wonder. Laughter and cheers echo against the valley walls, and the final group photos capture the spirit of the journey. In this quiet moment of pride and camaraderie, the raw beauty of Miyar Valley feels stitched into every heart. It’s a memory of wild places, new friendships, and dreams made real.
After a hearty farewell to your support team and fellow trekkers, you begin the long but scenic drive back to Manali, via Atal Tunnel, the same gateway that brought you here.
As you approach Beas Bridge, the familiar chaos of Manali
rushes back in the traffic, the chatter, the warmth of food stalls and
cafes.
Pro Tip: You can consider staying an extra day in Manali to decompress and reflect before re-entering regular life.
The Miyar Valley Trek Difficulty is rated as a moderate trek that makes it suitable for fit beginners as well as experienced trekkers, who are seeking for solitude and stunning Himalayan views. While the terrain itself is not technically difficult, the remote setting, high altitude, and long walking distances require good physical preparation and mental endurance.
Trail Conditions
The trail features gentle to moderate ascents, open alpine lush pastures, river crossings, and rocky patches. Unlike steep climbs found in treks like Hampta Pass or Buran Ghati, the Miyar valley’s trail has a more gradual elevation profile. Most days involve 5–7 hours of trekking with steady altitude gain.
Altitude Consideration
The trek reaches a maximum altitude of around 13,200 ft (Kesar Yon Choo). Campsites like Yolling, Zardong, Palpu, Gompa, and Tharang are all above 12,000 ft. Though this is not an extremely high-altitude trek, proper acclimatization is essential to avoid altitude sickness. Himalayan Hikers ensures a well-paced itinerary with gradual gains and rest periods.
Remoteness and Terrain
One of the key highlights of Miyar Valley trek is its isolation. The trail is far from road access, with no mobile connectivity beyond the base village. This adds a layer of challenge in terms of logistics and self-reliance, but it’s also what makes the trek uniquely peaceful and unspoiled. There are no technical sections (no ropes, no glacier walks), but river crossings and weather changes can add complexity.
Who Can Do Miyar Valley Trek?
- First-time trekkers with good fitness and previous trekking experience can attempt this trek.
- Experienced trekkers will enjoy the vast grasslands, solitude, and cultural immersion.
- It’s not recommended for those with altitude-related medical issues or anyone expecting high comfort in remote areas.
- Individuals above the age of 12 years and lower 62 years can good physical fitness can do this trek.
The Miyar Valley Trek difficulty level is moderate, with manageable gradients but long walking hours and high-altitude exposure. With the right preparation and a supportive team like Himalayan Hikers, it’s an achievable and deeply rewarding journey into one of Himachal’s last true wildernesses.
What is the Best Time to Visit Miyar Valley Trek?
The Miyar Valley Trek opens to trekkers in mid-June, once the snow begins to melt and the valley becomes accessible after the long winter. The season typically extends until late September. Earlier, the only route to Miyar valley was accessible only by Rohtang Pass. Which was almost inaccessible during the monsoon season.
However, the opening of the Atal Tunnel ensured the reliable and best alternate route to explore the charm of the Miyar Valley Trek in Monsoon season. It was a major breakthrough over the older Miyar Valley Trek Route via Rohtang Pass.
The Best Time to Visit The Miyar Valley is from mid-June to late September, with July and August offering the most vibrant scenery and September being ideal for stable weather and photography. Here’s what to expect during different parts of the season:
Mid-June to Early July
This is the freshest and greenest phase of the valley. Snow still lingers on high ridges, rivers run full with glacial melt, and wildflowers begin to bloom across the grasslands. The weather is cool and crisp, ideal for photography and comfortable trekking. Trails are less crowded, making it a great time for those seeking solitude.
Mid-July to August
The Miyar Valley Best Time To Visit is during the peak bloom season. The valley comes alive with alpine wildflowers in full display. This is when Miyar truly earns its title as the “Valley of Flowers of Himachal.” While there can be occasional light rain, the weather is generally stable in Lahaul thanks to its location in a rain-shadow region. Be prepared to enjoy dramatic skies, vibrant landscapes, and rich biodiversity.
September
Late-season trekking in September offers clear skies, dry trails, and golden meadows as autumn starts to settle in. Temperatures begin to drop, especially at night, but visibility is at its best. It’s a great time for those who want crisp views, quieter trails, and a cooler trekking experience.
Can I Trek Miyar Valley in Winter?
No, the Miyar Valley Trek is not accessible during winter. The region receives heavy snowfall from October onwards, and by late autumn, most of the trail, including campsites like Zardong, Palpu, and Gompa, becomes completely snowbound and inaccessible. Temperatures drop well below freezing, and high-altitude passes and river crossings become dangerous or impassable.
Additionally:
- Villages like Khanjer and Shukto are cut off from regular access during peak winter months.
- Rescue and communication infrastructure are limited, making it unsafe for organized trekking.
- Even locals migrate down to lower altitudes during this season.
The Miyar Valley Trek opens to trekkers in mid-June, once the snow begins to melt and the valley becomes accessible after the long winter. The season typically extends until late September. Earlier, the only route to Miyar valley was accessible only by Rohtang Pass. Which was almost inaccessible during the monsoon season.
However, the opening of the Atal Tunnel ensured the reliable and best alternate route to explore the charm of the Miyar Valley Trek in Monsoon season. It was a major breakthrough over the older Miyar Valley Trek Route via Rohtang Pass.
The Best Time to Visit The Miyar Valley is from mid-June to late September, with July and August offering the most vibrant scenery and September being ideal for stable weather and photography. Here’s what to expect during different parts of the season:
Mid-June to Early July
This is the freshest and greenest phase of the valley. Snow still lingers on high ridges, rivers run full with glacial melt, and wildflowers begin to bloom across the grasslands. The weather is cool and crisp, ideal for photography and comfortable trekking. Trails are less crowded, making it a great time for those seeking solitude.
Mid-July to August
The Miyar Valley Best Time To Visit is during the peak bloom season. The valley comes alive with alpine wildflowers in full display. This is when Miyar truly earns its title as the “Valley of Flowers of Himachal.” While there can be occasional light rain, the weather is generally stable in Lahaul thanks to its location in a rain-shadow region. Be prepared to enjoy dramatic skies, vibrant landscapes, and rich biodiversity.
September
Late-season trekking in September offers clear skies, dry trails, and golden meadows as autumn starts to settle in. Temperatures begin to drop, especially at night, but visibility is at its best. It’s a great time for those who want crisp views, quieter trails, and a cooler trekking experience.
Can I Trek Miyar Valley in Winter?
No, the Miyar Valley Trek is not accessible during winter. The region receives heavy snowfall from October onwards, and by late autumn, most of the trail, including campsites like Zardong, Palpu, and Gompa, becomes completely snowbound and inaccessible. Temperatures drop well below freezing, and high-altitude passes and river crossings become dangerous or impassable.
Additionally:
- Villages like Khanjer and Shukto are cut off from regular access during peak winter months.
- Rescue and communication infrastructure are limited, making it unsafe for organized trekking.
- Even locals migrate down to lower altitudes during this season.
Reaching the Miyar Valley Trek involves traveling deep into the remote Lahaul region of Himachal Pradesh. After the opening of the Atal Tunnel, this once-isolated valley is now far more accessible, making the journey to the trailhead smoother, faster, and more reliable throughout the trekking season. Here’s everything you need to know about the best routes and pickup logistics:
Reaching Pickup Location: Manali (Beas Bridge)
The official pickup point for the Miyar Valley trek with Himalayan Hikers is Beas Bridge, Manali, a well-known landmark near the Manali Mall Road area. Trekkers are kindly requested to report at the pickup point by 7:00 AM on Day 1 of the Miyar Valley Trek Itinerary. From here, the Himalayan Hikers team will receive you and provide an important briefing about the Miyar Valley. Then the team will coordinate shared transport to the trek’s starting point.
Best Route to the Khanjer Base Camp Village via Udaipur
After pickup, the drive to the base village Khanjer covers approximately 140 km and takes 5–6 hours, passing through breathtaking Himalayan landscapes. Here’s a breakdown:
- Manali to Atal Tunnel (South Portal) – 23 km
- Through the Atal Tunnel (9 km) – This engineering marvel cuts travel time significantly by connecting Kullu to Lahaul.
- Exit at Sissu, then continue towards Udaipur – The road follows the Chandra and Miyar Rivers, offering views of rugged cliffs and deep valleys.
- Udaipur to Khanjer – The final stretch becomes narrower and more remote as you approach the Miyar Valley Trek Base Camp. Khanjer, located at around 11,564 ft, serves as the trailhead for the Miyar Valley Trek.
How to Reach Miyar Valley Trek From Delhi
To get to the trek’s starting location in Manali, you have a few options:
- By Bus: Overnight Volvo buses operate regularly from Delhi, Chandigarh, and Dehradun to Manali. It’s a scenic and affordable option.
- By Air: The nearest airport is Bhuntar (Kullu-Manali Airport), about 50 km from Manali. From there, taxis and buses are available.
- By Train: The nearest railway station is Joginder Nagar, but it’s not well-connected. Chandigarh is a more practical railhead, followed by a road journey to Manali.
Important Note:
Due to the remote and weather-sensitive nature of the Miyar Valley Trek route, it’s advisable to arrive in Manali a day early, especially if traveling by air or during monsoon months. This also allows for last-minute gear checks and a relaxed start to your trek.
Necessary Items for trekkers
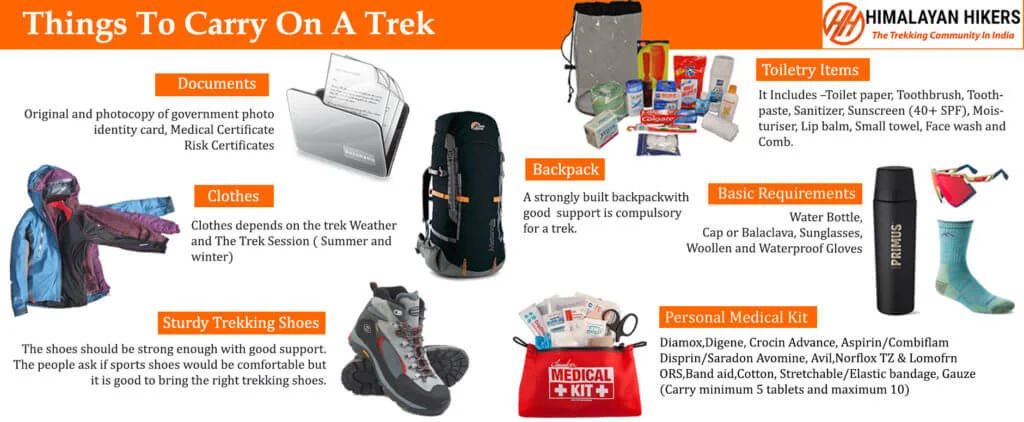
Mandatory Documents
Original and photocopy of government photo identity card- (Aadhar Card, Driving License, Voters ID, etc,)
Passport and Visa important to foreigners
Medical Certificate (First part should be filled by the Doctor and Second part by the Trekker)
Declaration Certificates
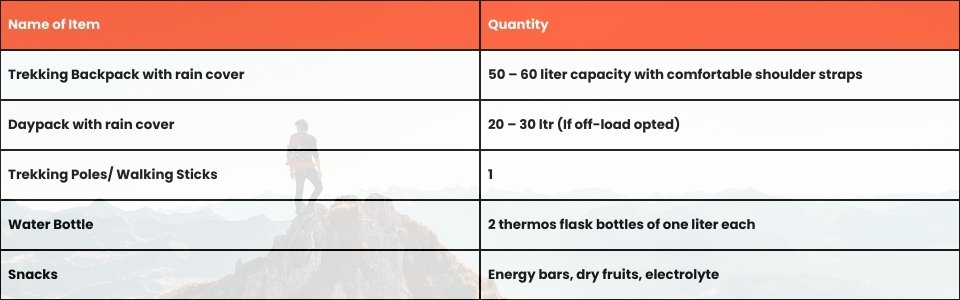
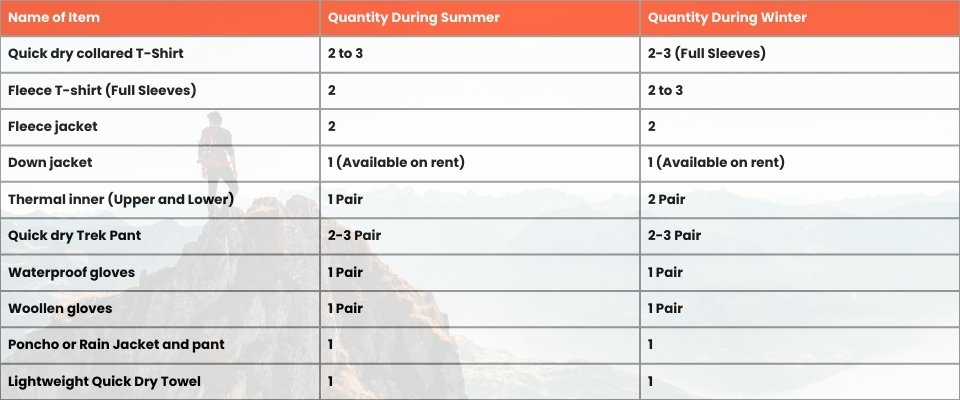
Note: – Many trekkers commit the same mistake of carrying unnecessary items on a trek which only makes the backpack heavy. It is important to know the right items to carry. It differs from season to season if you are trekking in summers then carry less layers of warm clothing and if you are trekking in winters carry enough layers to protect yourself against chilly cold.
Basic Trekking Gears
The Clothes You Should Bring On Satopanth Expedition
Head Gears

Foot Gears

Personal Care Essentials

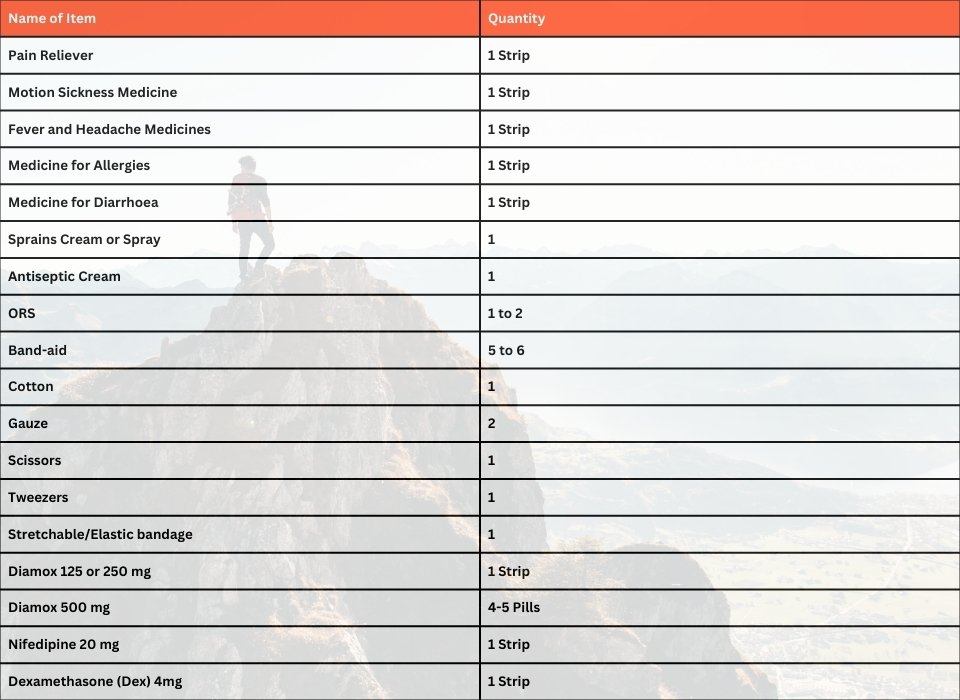
Carry a Personal Medical Kit
Are you Looking for Trekking Equipment on Rent?
If any trekker requires trekking equipment on rent, Himalayan Hikers offers the best-quality gear available for rental. Many individuals are in need of such equipment, and renting provides a cost-effective solution, allowing them to access high-quality gear at an affordable price without the need for a significant investment for short-term use.

Trek Equipment You can book directly on first day at the Base Camp.
Note:-
Please take all medicines only when prescribed by the doctor. In case you face any problem during your trek,
discuss and take advice from the Professional guide.
The Trek is one of the most popular treks in Uttarakhand, Himachal,Kashmir,Laddakh,Sikkim,Nepal, requiring both physical preparation and mental readiness. Although it is categorized as a moderate trek, reaches an elevation of over 12,720 feet and traverses remote Himalayan terrain, which can be physically and mentally challenging. Here's how you can prepare yourself for a safe and successful accomplishment of the Trek:
Physical Fitness
Building a good fitness base is essential for every trekker. The Trek itinerary involves 5 to 6 hours of walking every day. Though the trails are well-marked, they are often bumpy and include steep uphill sections, which may affect your stamina. You can overcome your physical limitation with a 6-week training program that you can begin about 2 months before your Trek. Your 6-week fitness routine should include

Pro Tip: If you have time, you can skip the Sunday training and go for a long-distance walk or mini day-hike (7–10 km) with a loaded backpack to simulate real trekking conditions. A short 1-day hike around your city/town can help a lot.
Mental Preparation
Physical strength is only half the journey, the other half is mental resilience. The trail takes you through remote clearings, steep climbs, cold starry nights, and no mobile connectivity. Be prepared to:
(I) - Detach from the digital world.
(II) - Embrace basic mountain living (camping, toilet tents, limited electricity).
(III) - Push through moments of fatigue, weather discomfort, or altitude effects.
A positive mindset, patience, and the ability to adapt will carry you farther than muscle ever could.Himalayan Hikers is a reputable trekking company that places a high priority on safety. Here are some of the safety measures they take to ensure the safety of their clients during the Trek:
Experienced Guides: Himalayan Hikers hires experienced and certified guides who are well-versed in the terrain, weather conditions, and local culture. These guides have first-hand knowledge of the routes and are equipped to handle any emergency situations that may arise.
Proper Gear: The company provides all the necessary gear and equipment to their clients to ensure comfort and safety during the trek.
Hygiene and Sanitation: Himalayan Hikers places great emphasis on hygiene and sanitation during the Trek. They provide clean drinking water, hand sanitizers, and toilet tents to ensure that their clients are healthy and comfortable.
Emergency Services: The company has a well-defined protocol for handling emergency situations. They have a team of trained medical professionals who are available 24/7 and can be quickly mobilized in case of an emergency.
Acclimatization: Himalayan Hikers follows a gradual acclimatization process during treks to ensure that their clients adjust to the high altitude gradually. They also monitor the health of their clients regularly and provide necessary medical attention if required.
Overall, Himalayan Hikers places a great emphasis on safety and takes all necessary measures to ensure the safety and well-being of their clients during treks.
| Category | Details |
|---|---|
| Transport | Transport from Manali To Manali traveller & taxi |
| Permits & Entry | Forest Permit and Entrance Fees |
| Accommodation | Tented Accommodation on Twin / triple Sharing |
| Meals | Breakfast, Lunch, Tea, Coffee, Snacks, Soup, Dinner (All meals included) |
| Camping Gear | High-Quality Dome Tents, Sleeping Bags, Mattress, Liner |
| Sanitation Setup | Separate Toilet Tents (Ladies & Gents), Dining Tent, Dining Table, Camping Chair |
| Support Staff | Kitchen Team, Trek Helpers |
| Communication Tools | Radio Walkie-Talkie |
| Trek Guides | Experienced Trek Leader & Technical Guide |
| Safety Equipment | Medical Kit, Oxygen Cylinders, Pulse Oximeter |
| Trekking Equipment | Crampons, Gaiters, Ice ax |
| Category | Details |
|---|---|
| Meals (Not Included) | –Day 1:En route Breakfast to base camp–Day 7:En route Lunch & Dinner (not included) |
| Personal Essentials | – Personal Toiletry Items– Personal Medical Kit |
| Porter Service | – The porter fee for the entire trek is ₹3,000. (to be paid directly at Manali base camp)– Minimum bag weight for porter:8 kg |
| Foreign Nationals | – ₹1600 extra for trekking permit–Passportand validVisarequired |
Note: Please bring your own lunch box for the hot lunch.
Emergency evacuations and Hospitalization charges Extra
Important Note
Himalayan Hikers offers both online and offline booking options for their treks. Here’s a breakdown of both options:
1. Online Booking:
- Website: Himalayan Hikers has an official website where trekkers can browse through different treks, check details (itineraries, costs, difficulty level, etc.), and make bookings. Payment gateways are integrated for secure online transactions.
- Third-Party Platforms: They might also be listed on various trekking or adventure booking platforms, where you can compare prices, read reviews, and make bookings.
- Email Communication: Trekkers can inquire about treks via email and complete the booking process online, following email communication and payment.
2. Offline Booking:
- Direct Office Visit: Himalayan Hikers has physical offices (especially in Uttarakhand), where trekkers can visit in person, discuss treks, and complete bookings directly.
- Phone Booking: You can also call their office to make a booking. Details about payment methods, trek dates, and other logistics can be confirmed over the phone.
Yes, Himalayan Hikers requires a 25% advance payment for booking treks, Via- Google pay or UPI, Directly Himalayan Hikers Account with the remaining amount to be paid in cash at their branch office in Manali before the trek starts.
Map not available for this trek.
Whether climbing an amazing ridge line, sleeping under a blanket of stars, or simply enjoying the fresh air of the mountains, we can never predict what may happen. From twisting ankles to Altitude Sickness or sudden weather conditions preventing you from crossing a pass in time, trekking Insurance is extremely valuable in any adventure.
Safety Comes First
Having Trekking Insurance whilst on a trek with Himalayan Hikers ensures peace of mind. Conditions in the mountains can change very quickly, and having insurance means that if anything unexpected were to happen, you have a safety net to fall back on.
Emergency Coverage When It Counts
On treks, there are many risks including injury and altitude related issues. Taking out good Trekking Insurance will ensure that in an emergency, you will be able to receive search and rescue, medical treatment, and in cases where hospital treatment is required, and transport to receive the right care. As these can be very expensive and slow to arrive in remote locations, having these covered in your Insurance means that you can just concentrate on getting better.
Financial Protection
If you experience a medical issue while on a trek away from civilisation, without insurance, it could put a serious dent in you and your family’s finances. With the correct insurance in place, you can be insured for up to 1 Lakh rupees in order to avoid losing too much money due to a single incident.
Affordable and Easy Through Our Partner
Himalayan Hikers has partnered with ASC 360 to offer trekking insurance at just ₹50 per day, that means for the price of a cup of coffee, you get cover for the entire journey.
We strongly advise every trekker to take insurance for any trek within India, whether it is a gentle weekend trail or a high-altitude expedition. Mountains reward preparation, and insurance is part of it.

The Miyar Valley Trek distance spans around 60 kilometers, typically taking 7 Days and 6 Nights to complete, depending on the pace and route. The trek covers diverse terrains, including forests, rivers, and snow-capped mountains.
You can reach Miyar Valley by traveling to Keylong in Himachal Pradesh via road. From Keylong, you’ll need to drive further to Udaipur, and then trek to the valley. You can also hire a taxi or join a guided trek to simplify transportation.
Miyar Valley is located in the northern part of Himachal Pradesh, India, in the Great Himalayan Range. It lies between the Lahaul and Pangi regions, offering a stunning view of glaciers, meadows, and rugged mountain peaks.
The best time for the Miyar Valley Trek is from mid-May to October. During these months, the weather is more favorable, with clear skies and moderate temperatures, making the trek safer and more enjoyable.
The Miyar Valley Trek is considered moderate to challenging. It involves long days of walking, some steep ascents, and high-altitude conditions, which can make it demanding. It requires a good level of fitness and prior trekking experience.
Yes, physical fitness is essential for the Miyar Valley Trek. The trek involves long hikes, steep ascents, and high-altitude conditions. Regular cardio exercises and strength training can help prepare your body for the challenges of this trek.
The weather in Miyar Valley varies with altitude, but you can generally expect cool, pleasant temperatures during the day and cold nights. There can be occasional rain or snowfall, especially at higher altitudes. It’s important to be prepared for changing conditions.
To trek in Miyar Valley, you’ll need permits from the local forest department. But if you are trekking with an organized group, then you will not have to worry about getting permits, as everything will be handled by your trek organizer.
The Miyar Valley Trek is considered moderate to challenging. It involves long days of walking, steep ascents, and high-altitude conditions. Trekking experience and a good level of fitness are required to handle the demands of the trek.